Maroon Bells Four Pass Loop trail guide for permitted backpackers
One of the best moments on any hike is when you turn the corner or take that last step before the view takes your breath away. On this loop, you’ll experience that moment over and over and over again.
“There’s not a single bad view on this loop,” my dad, David Fries, said multiple times as we backpacked the Maroon Bells Four Pass Loop.
You’ll see wildlife and pass waterfalls, alpine lakes and rivers while hiking over four summits above 12,000 feet that overlook colorful valleys with blooming wildflowers and those iconic red mountain peaks. If you’re a backpacker, this one must go on your bucket list.

This guide will help you plan and complete an epic Colorado backpacking trip.
PLANNING YOUR TRIP
Permits
To camp overnight in the Maroon Bells-Snowmass Wilderness, permits are required year-round through recreation.gov. The best time to visit is between July and September. You’ll risk snow outside of that sweet spot. Campers will need a reservation for each “zone” you want to sleep in. We picked the Maroon zone, then the North Fork zone and the Snowmass Lake zone for our clockwise four-day, three-night trip. The permits allow up to four people, with a couple of the zones allowing larger groups up to 10.
Key reservation dates (subject to change for future years):
- Feb. 15, 2023: Permits opened at 8 a.m. for Feb. 15-July 31
- June 15, 2023: Permits opened at 8 a.m. for Aug. 1-Nov. 30
- Oct. 15, 2023: Permits open at 8 a.m. for Dec. 1-March 31, 2024
Each night cost $22 for a total of $66 for my three-night trip. For information on where campsites are located and where you can and can’t have campfires, click here.
Shuttle and parking
A limited number of vehicles are allowed to park at the Maroon Bells scenic area at the trailhead. Parking reservations ($10) are required May 15-Oct. 31 for day use, 24-hour parking or overnight parking for up to two nights. Because my dad and I were staying three nights, we opted to park at the free overnight Buttermilk Ski Area lot instead. There is also parking available at Aspen Highlands, where the shuttle departs, at a cost of $40 a day.
If you’re like us, you’ll be taking the shuttle up to the West Maroon Lake trailhead to start the loop. The shuttle runs from 7 a.m. to 5 p.m. and costs $16 for adults, and $10 for seniors and children if bought in advance. Day-of tickets are $20 for adults and $14 for seniors and children. If you get dropped off at the trailhead before or after the bus starts running, you can purchase a one-way downhill ticket for the return for $10.
To get from the Buttermilk Ski Area lot to Aspen Highlands, you can take the free RFTA bus. We were able to take the BRT Aspen bus three stops and then the CM Highlands bus up to the resort.

Gear
Aside from the basics (tent, sleeping bag, water filter, etc.), be prepared for the weather. The Colorado mountains, especially those passes, can see afternoon storms that are much more brutal at 12,000 feet. If you’re a hammock sleeper, be assured that there are enough trees, even at this high elevation, to string up your bed. A paper map is a must (this one from National Geographic was a lifesaver). And unless you have knees made of steel, I would highly recommend hiking poles. If you’re looking for a great backpacking tent that won’t break the bank, the Trekker Tent 1 from River Country was awesome for me.
HIKING THE FOUR PASS LOOP
My dad and I decided to do the loop clockwise, so here’s a breakdown of each day on the trail. While AllTrails reports this loop as roughly 26 miles, we logged 28.6 miles total. The extra mileage came from finding places to filter water and looking at several campsites before settling down for the night.
Our goal with each day was to hike as far as we could to the foot of whichever pass we’d be climbing the next day, so we’d start our day with an ascent and finish with the downhill or flatter bits of trail. We also took hours-long breaks during the afternoons to avoid the hottest time of the day, while we rested our legs and rehydrated near water sources before continuing on to find a camp in the evening.

David Fries hikes around Crater Lake near the Maroon Bells on Sept. 7, 2023. (Tynin Fries, The Denver Post)
A view of the Maroon Bells on Sept. 7, 2023. (David Fries, Provided by Tynin Fries)
A bull moose eats along the Maroon Bells Four Pass Loop trail on Sept. 7, 2023. (David Fries, Provided by Tynin Fries)
The sun set over the Maroon Bells on Sept. 7, 2023. (Tynin Fries, The Denver Post)
The sun set over the Maroon Bells on Sept. 7, 2023. The null is one of the last camping areas before submitting West Maroon Pass. (Tynin Fries, The Denver Post)


Day 1: Maroon Lake Trailhead to West Maroon Pass
- 6 miles
- 2,500 feet of elevation gain
- 440 feet of elevation loss
The first day of our trip did not include any of the four passes. We wanted to hike the loop clockwise to give our lungs and bodies time to adjust to the altitude. There is significant elevation gain on this first day but it is gradual. There are plenty of water sources as you hike alongside a creek for most of the day.
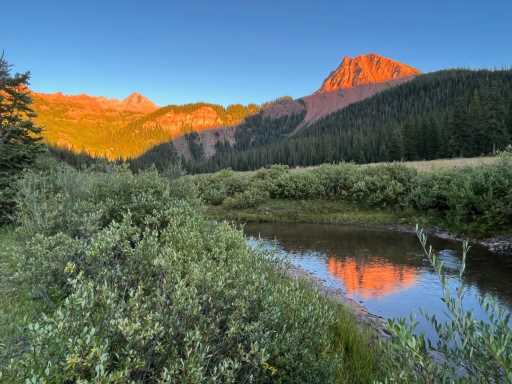
We pushed as far as we possibly could on the first day to the foot of West Maroon Pass. I’d highly recommend the last few campsites before the ascent as they are located in small groups of trees on nulls that overlook the West Maroon Valley. The sunset lights up the red mountains to a golden orange and wildlife all start coming out in the evening. We spotted a bull moose, about a dozen deer, marmots and pikas that first night.
A view from the top of West Maroon Pass on Sept. 8, 2023. (Tynin Fries, The Denver Post)
A view from the top of West Maroon Pass on Sept. 8, 2023. (Tynin Fries, The Denver Post)
David Fries and Tynin Fries pose for a photo in the East Fork zone of the Four Pass Loop trail on Sept. 8, 2023. (Provided by Tynin Fries, The Denver Post)
David Fries and Tynin Fries pose on top of Frigid Air Pass on Sept. 8, 2023. (Provided by Tynin Fries, The Denver Post)
Tynin Fries poses on the descent from Frigid Air Pass on Sept. 8, 2023. (David Fries, Provided by Tynin Fries)
A view of the Maroon Bells on Sept. 8, 2023. (Tynin Fries, The Denver Post)
The North Fork River on Sept. 8, 2023. (Tynin Fries, The Denver Post)


Day 2: West Maroon Pass to North Fork
- 8 miles
- 1,660 feet of elevation gain
- 2,900 feet of elevation loss
On day two, you’ll immediately start the climb up West Maroon Pass. The views below as you climb are incredible. And there are a couple of spots for water between the last campsites and the pass. It took us approximately an hour to get to the top of the summit (12,490 feet).
Then, you’ll do a short descent before starting the climb up to Frigid Air Pass (12,400 feet). The trail between these two passes has a couple of streams for water, but there’s not much shade. I wouldn’t recommend camping in the East Fork zone but rather pushing to finish Frigid Air to camp in the North Fork zone. Frigid Air is true to its name and very windy on top. The climb is steep but also short.
Once you finish both passes, you’ll head downhill into a valley where you’ll hike along the North Fork Crystal River. There are tons of campsites to choose from in this area, but I’d recommend picking a spot past the waterfall or even the river crossing if you’re able. The river crossing requires you to swap boots for sandals. And the sunset by the river was one of the best views of the trip.
David Fries and Tynin Fries pose for a photo atop Trail Rider Pass on Sept. 9, 2023. This is the third 12,000-foot pass the duo completed on the Maroon Bells Four Pass loop trail. (Provided by Tynin Fries, The Denver Post)
Hikers start to descend Trail Rider Pass on Sept. 9, 2023. (Tynin Fries, The Denver Post)
A view of Snowmass Lake from the top of Trail Rider Pass on Sept. 9, 2023. (Tynin Fries, The Denver Post)
A view of the North Fork zone from the top of Trail Rider Pass on Sept. 9, 2023. (Tynin Fries, The Denver Post)
Snowmass Lake on Sept. 9, 2023. (David Fries, Provided by Tynin Fries)
A view of Buckskin Pass and Snowmass Creek during sunset on Sept. 9, 2023. (Tynin Fries, The Denver Post)


Day 3: North Fork to Snowmass Creek
- 7.5 miles
- 2,540 feet of elevation gain
- 2,010 feet of elevation loss
Get ready for a climb. This is by far the most intense day with nearly 4 miles of steep climbing. Hiking through the steep aspen groves is gorgeous, but it is a workout. And beware that there’s a false summit, so once you think you’re getting close, you’ll come to a small plateau with a lake for rehydrating before heading to the top of Trail Rider Pass (12,420 feet). At the top, you’ll get a bird’s-eye view of Snowmass Lake.
The descent is also a bit rough with steep switchbacks and a couple of scrambles over rock piles. The lake looks close, but it’s another couple miles down before you can get to the water. Snowmass Lake is the most popular camping area on the loop and feels a bit crowded. The lake is awesome for a soak or fishing, but we decided not to camp at the lake so we could have more privacy. My dad successfully did some fishing while we rested in the afternoon. We later continued on toward the Snowmass Creek campsites where we had no neighbors and were right by the water.
David Fries hikes up Buckskin Pass on Sept. 10, 2023. (Tynin Fries, The Denver Post)
Tynin Fries hikes up Buckskin Pass on Sept. 10, 2023.(Provided by Tynin Fries, The Denver Post)
A storm rolls over the top of Buckskin Pass on Sept. 10, 2023.(Tynin Fries, The Denver Post)


Day 4: Snowmass Creek to Maroon Lake Trailhead
- 6.5 miles
- 2,000 feet of elevation gain
- 3,560 feet of elevation loss
We finished off the loop with an early morning (there was weather on the horizon we were trying to beat) to climb up Buckskin Pass (12,462 feet). There are several streams for water and if you’re an early bird, you’ll hike in the shade until you reach the summit. The climb isn’t as hard as Trail Rider, but there are a few steep switchbacks at the end.
The views from the top give you an awesome look back at Trail Rider from the previous day as well as a view of the hike down back toward West Maroon trailhead. We ran into a short but intense bout of rain and hail at the top; however, it quickly passed and gave way to sunshine for the rest of our 3,000-foot descent back to the shuttle. Plenty of water and shade on the way down, but if you’re like us, you’ll be itching to get back to town for a real meal, beer and a shower.
Overall, this is a fantastic trail no matter how many days you choose to complete it in. Several trails that run through the area allow for a shorter hike, but the full loop is one of the coolest trips I’ve been on in Colorado.
Subscribe to our weekly newsletter, The Adventurist, to get outdoors news sent straight to your inbox.
Source: Read Full Article